Bollard Installation Guide: From Planning to Final Testing
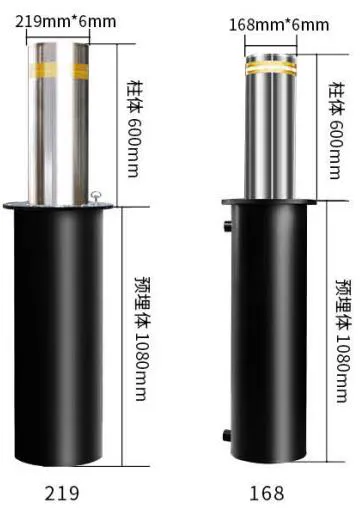
Automatic rising bollards are an increasingly popular solution for traffic control, perimeter security, and pedestrian zone management. While professional installation is always recommended, understanding the process helps you plan your project, coordinate with contractors, and ensure a successful outcome.
Phase 1: Site Survey and Planning
Before ordering equipment, conduct a thorough site survey. Key considerations include: determine the exact bollard locations and spacing (typically 1.0–1.5m center-to-center for vehicle blocking), identify underground utilities — gas lines, water pipes, electrical conduits, communication cables, assess soil conditions — rocky soil may require specialized drilling equipment, measure the water table — high water tables need additional drainage planning, and confirm traffic patterns to ensure bollards are placed where they won't be accidentally struck by turning vehicles.
Phase 2: Foundation Preparation
The foundation is the most critical part of the installation. Standard automatic bollards require a concrete foundation pit approximately 600–800mm deep and 500–600mm in diameter per bollard. Steps: excavate the foundation pits, install PVC drainage pipes connecting each pit to a drainage outlet, build formwork if soil conditions are loose, install rebar cage for structural reinforcement, pour C25 or higher grade concrete, and cure for minimum 7 days before bollard installation.
Phase 3: Electrical Preparation
Bollards require reliable electrical supply. Plan for: dedicated power circuit per group of bollards (typically 220V AC), underground conduit running from the control cabinet to each bollard location, control cables for limit switches and status feedback, optional integration wiring for: access control readers, traffic lights, induction loops, and remote control panels.
Phase 4: Bollard Installation
After concrete has cured: position the bollard housing into the foundation pit, level the bollard using shims — the top flange should be flush with the finished ground level, connect drainage pipes to the bollard's internal drainage, run power and control cables through the conduit entry, secure the housing with anchor bolts, and install the stainless steel top cover and LED warning lights.
Phase 5: Commissioning and Testing
Before handover, conduct thorough testing: test each bollard individually — raise/lower cycle at least 20 times, verify synchronization in group operation, test emergency functions — manual release, UPS backup (if installed), fire alarm interface, test safety features — obstacle detection and auto-reverse, verify all warning lights and audible signals work correctly, and train site personnel on operation and emergency procedures.
Common Pitfalls to Avoid
1. Insufficient drainage — standing water in the foundation pit will damage the hydraulic or electric actuator. 2. Undersized electrical supply — voltage drop can cause erratic operation. 3. Skipping the curing period — installing bollards before concrete is fully cured leads to misalignment. 4. No spare conduits — always run at least one spare conduit for future upgrades.
Conclusion
A well-installed bollard system provides years of reliable service. The key is proper planning, quality foundation work, and thorough commissioning. GateFlow provides detailed installation manuals with every order and can connect you with experienced local installers. Contact us for a consultation on your bollard project.
Reading Guide & Further Reflection
This article is recommended for project managers, property administrators, security system integrators, and industry practitioners planning or upgrading entrance management systems. We suggest focusing on the following while reading: First, compare the technical parameters and selection criteria in this article against your actual project conditions — every project has unique characteristics, and general guidance needs adjustment for specific site conditions. Second, note the industry data and case details mentioned, which can serve as reference material for project proposal justification and budget planning. Third, if any technical concepts or product specifications are unclear, we recommend documenting them and consulting professional suppliers' technical teams to avoid selection errors from misinterpretation. Finally, convert the practical recommendations in this article into a checklist for your project, verifying each item during solution review and construction acceptance to ensure every critical step is properly addressed.
The GateFlow technical team offers complimentary solution evaluation services for your project. Simply send us your project requirements including site conditions, expected traffic volume, budget range, and any special requirements — our engineers will provide preliminary solution recommendations covering equipment selection, system architecture, and estimated costs after thorough analysis. This service is completely free with no purchase obligation — we believe building trust through professional technical exchange is more valuable than any sales pitch.
GateFlow is a global leader in intelligent entrance management equipment manufacturing, offering a complete range of barrier gates, sliding gates, turnstiles, license plate recognition, facial recognition, bollards, and RFID accessories. We maintain a factory-direct model, delivering competitive pricing and reliable product quality to clients across 50+ countries. Whether you need rapid delivery of standard models or customized colors, dimensions, logos, and functional configurations tailored to your project, our OEM/ODM team provides technical feasibility assessment and customization proposals within 2 working days.
Browse more industry articles on our blog listing page. For the latest product pricing, technical specifications, or project case studies, please visit our Products Center or contact our sales team directly. GateFlow looks forward to partnering with you to build smarter, safer, and more efficient entrance management systems.
GateFlow products are certified to ISO 9001 quality management systems, CE, RoHS, and other international standards. Our production facility features advanced sheet metal fabrication centers, automated coating lines, electronics assembly lines, and comprehensive finished product testing laboratories — fully traceable from raw material receiving to finished product shipment. Wherever you are located, we provide product configurations compliant with local voltage standards and installation codes, and support you through customs clearance, transportation, and on-site installation and commissioning. Contact us to begin your entrance management system upgrade journey.